Melissa K. Norris
  • Start here
  • Podcast
  • Articles
  • Books
    • The Family Garden Planner
    • The Family Garden Plan
    • Hand Made
    • The Made From Scratch Life
  • Classes
  • Academy
Log In

Canned Tomato Sauce Recipe (+ Water-bath & Pressure Canning)

August 19, 2020 by Melissa Norris 96 Comments

Home-canned tomato sauce from vine-ripened tomatoes may as well be an entirely new product as there is no comparison to store-bought. It's incredibly easy to make and you can water bath or pressure can it for long-term food storage.

Vertical view of an open jar of tomato sauce with fresh tomatoes on the counter and a teaspoon of dried basil.

Follow this easy step-by-step tutorial for my favorite canned tomato sauce recipe and enjoy it spiced up as pizza or spaghetti sauce, use it in chili, for tomato soup, barbecue sauce, cabbage rolls, and so much more.

Learning how to can tomato sauce is life-changing. No, seriously, with a single jar you can create pretty much anything your heart desires with tomato sauce as the base.

Using my principles for growing a year's worth of tomatoes (and then saving the seeds for the following year's garden), I am able to can our entire years worth of tomato sauce. Never having to purchase tomato, pizza, or spaghetti sauce from the store is pretty amazing. In fact, I dare say this may be the most versatile item in my home food storage.

And let me tell ya, if you've never had homemade tomato sauce before made from vine-ripened tomatoes, then you've never had tomato sauce before. All else is an imitation, my friend.

If you're struggling to grow enough tomatoes to put up for sauce, you can always buy them from the farmer's market. But you may also be interested in how to prune tomatoes for a better harvest, or even my 10 tomato growing tips for a disease-free harvest.

Be sure to also check out these 129+ canning recipes to put up this year!

How Do You Can Tomato Sauce?

The best part about canning homemade tomato sauce is that you've got options! (A girl can never have too many options for canning recipes, right?)

You can use both water bath and pressure canning methods for this canned tomato sauce recipe. So keep reading below to see which option best suits your needs.

If you feel like you could use a bit more hand-holding for canning tomato sauce, you may be interested in my Tomato Canning eCourse! (It's only $19 and includes how to can salsa and other sauces as well!)

What Tomatoes Make the Best Sauce?

First off, you can use any tomato, but truly, paste tomatoes are the best for making sauces.

Why you ask? (I love it when you ask questions, I truly do!)

Paste tomatoes have less water inside and are fleshier. This results in a thicker sauce without so much reduction time.

I'm all about saving time in the kitchen!

Some good paste tomato options are Roma tomatoes and, of course, the mother of all paste tomatoes (and possibly, quite possibly, the best paste tomato of the bunch) is the heirloom San Marzano Lungo No. 2.

A white colander filled with fresh tomatoes.

This also happens to be one of the varieties I grew this year and ripened first. We liked the flavor diced and tossed onto pizza, but it really shines in sauces and pastes.How Many Tomatoes Do I Need To Make Tomato Sauce?

You need a lot of tomatoes at once to make tomato sauce. This may be difficult if you don't have a large number of tomato plants and your tomatoes are ripening over a long span of time.

I've heard some folks blanch and freeze their tomatoes until they get enough for a big batch. While others will just buy a flat or two at the local farmer's market. It's up to you how you source them, but for this canned tomato sauce recipe, you'll want at least 20 pounds of tomatoes to make about 7 pints of sauce.

Ingredients

  • Tomatoes (about 20 pounds makes 7 pints of sauce), I recommend San Marzano, Roma or another paste tomato, but remember, any tomato will do!
  • Bottled lemon juice (1 Tablespoon per pint jar and 2 Tablespoons per quart jar). 
  • Salt (1/4 teaspoon per pint jar and 1/2 teaspoon per quart jar)
  • Dried basil, optional (1/2 teaspoon per pint jar, 1 teaspoon per quart jar)
  • Canning jars, lids, and bands
  • Either a water bath or pressure canner

Making This Tomato Sauce Recipe

Sliced tomatoes on a blue cutting board with a knife.

1. The first step, pick yourself some tomatoes! I don't have a food scale so I harvested what was ripe. I had about 45 ripe tomatoes which I'm guessing was about 10 pounds of tomatoes, it yielded three pint jars in the end.

2. Take out a big old stockpot and chop up 6 tomatoes. I chopped mine into thirds.

Tomatoes on the bottom of a large stockpot and a potato masher mashing the tomatoes.

3. Cover the bottom of the stockpot with one layer of chopped tomatoes. Take a potato masher and squish them to get their juices running. Turn the pot on medium-high.

4. Once the tomatoes begin to boil, add 6 more chopped tomatoes. Stir frequently to prevent scorching, but also make sure the tomatoes continue to boil.

~ It was kind of like a square dance in my kitchen… chop tomatoes, turn to the pot, dip and dump tomatoes, stir, and twirl back to the island, repeat. (Can you tell I just love canning?)

A stockpot filled with boiling tomato sauce.

5. Continue adding chopped tomatoes, one layer at a time, until you've added all your tomatoes or you're in danger of overflowing your pot. If you're working with a larger batch, you can use two large pots.

6. Mash each layer well as you continue to stir and allow tomatoes to boil.

7. Continue to boil for approximately 10 minutes. You want all the tomatoes cooked and mushy, with their glorious juices released.

Tomatoes being pureed through a fine mesh sieve.

8. Remove cooked tomatoes from heat. Put mixture through a fine sieve (which is my preference) or a food mill positioned over a large mixing bowl, preferably with measurements so you know how many cups of sauce you end up with.

9. Now that you know how many cups of sauce you have, you can gather the appropriate number and size jars for canning.

By the way, do you see that sieve? It was my great-grandmother's! I hope one day it will be my daughter's.

I get a little bit sentimental every time I use it. Yes, kitchen gadgets can do that to a girl. (Here's a similar canning sieve on Amazon.)

TIP: You can dehydrate the leftover skins for a tomato powder (or feed them to the pigs as I did!).

10. Put the strained tomato mixture back into the stockpot and bring to a boil. Turn down to a simmer and allow it to reduce down to the desired thickness. I reduced mine for about 40 minutes and let about an inch of the liquid evaporate.

Empty pint jars with a tablespoon of lemon juice and a teaspoon of salt sitting on the counter.

11. Meanwhile, prepare your jars, gather your lids, and either your water bath canner or your pressure canner.

12. Add bottled lemon juice, salt, and optional herbs into each jar (see ingredients above for amounts).

NOTE: Lemon juice, salt, and herbs should be added to each individual jar, not the pot of tomato sauce. And you must add the bottled lemon juice for safe shelf stability.

A pint jar filled with tomato sauce and a canning tool measuring 1/2 inch head-space in the jar.

13. Fill jars with tomato sauce up to a 1/2-inch headspace for water bath canning and 1-inch headspace for pressure canning. I did a water bath due to the smaller size of the run…. only 3 jars.

14. Run a spatula around the jar circumference to remove air bubbles. Add more tomato sauce if needed to keep 1/2-inch or 1-inch headspace depending upon your method of canning.

15. With a damp clean cloth, wipe the rim of the jar clean. Place on lids and screw down the bands until resistance is met, then to fingertip tight.

Water Bath Canning Instructions

1. Place jars on a rack inside your water bath canner.

2. Make sure at least 1 inch of water is covering the tops of the jars.

3. Once you've got rolling boiling water, process pint jars for 35 minutes or quart jars for 40 minutes.

NOTE: See recipe notes for altitude adjustments above 1,000 feet in elevation.

4. Turn off heat and remove the lid from the canner. Allow jars to rest inside the water bath for 5 minutes.

NOTE: If you remove jars immediately, you run the risk of cracking the jars or the siphoning of liquid, which can inhibit a proper seal.

5. Using a jar lifter, carefully lift jars out of the canner and place them in a draft-free area on a kitchen towel folded in thirds. Never place hot jars on a cold countertop.

6. Allow jars to rest, untouched for at least 12 hours, 24 hours if you have the counter space.

7. Remove bands and check seals then move to the pantry for storage. (If any jars didn't seal, store them in the refrigerator and use within a day or two.)

Pressure Canning Instructions

1. Add water to pressure canner, put in the rack, and load jars.

2. Lock the lid, bring to a boil, and allow the pressure canner to vent steam for 10 minutes.

3. Put the weight on and allow the canner to come up to 10 pounds of pressure (or use a weighted gauge, depending on your pressure canner).

NOTE: See recipe notes for altitude adjustments above 1,000 feet in elevation.

4. Start processing time after weight begins rocking and hissing, or dial gauge reads 10 pounds of pressure.

5. Process both pint and quart-size jars for 15 minutes.

6. Allow pressure canner to cool down naturally and for pressure to return to normal.

7. Carefully remove the hot lid and wait another 10 minutes before taking jars out of canner.

NOTE: If you remove jars immediately, you run the risk of cracking the jars or the siphoning of liquid, which can inhibit a proper seal.

8. Using a jar lifter, carefully lift jars out of the canner and place them in a draft-free area on a kitchen towel folded in thirds. Never place hot jars on a cold countertop.

9. Allow jars to rest, untouched for at least 12 hours, 24 hours if you have the counter space.

10. Remove bands and check seals then move to the pantry for storage. (If any jars didn't seal, store them in the refrigerator and use within a day or two.)

NOTE: If you have enough tomato sauce to fill all the jars needed for a run in the pressure canner, I'd use the pressure canner. Food may reach a hotter temperature in the pressure canner, but because it's processed for less time, it retains more of the nutrients. But, if you don't have enough jars or don't have a pressure canner, the water bath is completely safe with this recipe.

Vertical view of an open jar of tomato sauce with fresh tomatoes on the counter and a teaspoon of dried basil.

Now stand back and look at those gorgeous scarlet jars, just begging to be simmered all day for spaghetti, in chili, or in these slow cooker cabbage rolls. 

Seriously, does anyone else like to sit and stare at the rows of home-canned food, or am I the only one weird that way? I'm hoping now that you know how to can tomato sauce, you'll be staring at them, too.

Want to learn how to pressure can?

I have a FREE pressure canning video series here walking you through how to:

  • safely pressure can without fear of blowing it up or exploding
  • how to make sure you stay SAFE and avoid botulism
  • the science of canning so you always stay safe
  • what foods CANNOT be canned at home, even in a pressure canner
  • and more

It's completely free and I've taught hundreds of people how to pressure can, you're in good hands! Click here to snag your seat and get started pressure canning today.

Canned Tomato Sauce

Melissa Norris
Learn how to can tomato sauce at home with this easy recipe, safe for both water bath or pressure canning!
5 from 1 vote
Print Recipe Pin Recipe
Prep Time 1 hr
Cook Time 1 hr
Canning Time 35 mins
Total Time 2 hrs 35 mins
Course Sauce
Cuisine Italian
Servings 14 cups
Calories 119 kcal

Equipment

  • Pressure Canner or Water Bath Canner
  • Canning Jars and Lids

Ingredients
  

  • 20 pounds tomatoes 20 pounds makes about 7 pints of sauce
  • 7 tbsp bottled lemon juice
  • 1.75 tsp salt
  • 3.5 tsp dried basil optional

Instructions
 

  • Pick your fresh tomatoes.
  • Take out a big old stockpot and chop up 6 tomatoes. I chopped mine into thirds.
  • Cover the bottom of the stockpot with one layer of chopped tomatoes. Take a potato masher and squish them to get their juices running. Turn the pot on medium-high.
  • Once the tomatoes begin to boil, add 6 more chopped tomatoes. Stir frequently to prevent scorching, but also make sure the tomatoes continue to boil.
  • Continue adding chopped tomatoes, one layer at a time, until you’ve added all your tomatoes or you’re in danger of overflowing your pot. If you’re working with a larger batch, you can use two large pots.
  • Mash each layer well as you continue to stir and allow tomatoes to boil.
  • Continue to boil for approximately 10 minutes. You want all the tomatoes cooked and mushy, with their glorious juices released.
  • Remove cooked tomatoes from heat. Put mixture through a fine sieve (which is my preference) or a food mill positioned over a large mixing bowl, preferably with measurements so you know how many cups of sauce you end up with.
  • Now that you know how many cups of sauce you have, you can gather the appropriate number and size jars for canning.
  • Put the strained tomato mixture back into the stockpot and bring to a boil. Turn down to a simmer and allow it to reduce down to the desired thickness. I reduced mine for about 40 minutes and let about an inch of liquid evaporate.
  • Meanwhile, prepare your jars, gather your lids, and either your water bath canner or your pressure canner.
  • Add 1 Tablespoon bottled lemon juice to each pint jar, 2 Tablespoons lemon juice to each quart jar.
  • Add 1/4 teaspoon salt to each pint jar, 1/2 teaspoon salt to each quart jar.
  • Add 1/2 teaspoon dried basil to each pint jar, 1 teaspoon dried basil to each quart jar.
  • Fill jars with tomato sauce up to a 1/2-inch headspace for water bath canning and 1-inch headspace for pressure canning.
  • Run a spatula around the jar circumference to remove air bubbles. Add more tomato sauce if needed to keep 1/2-inch or 1-inch headspace depending upon your method of canning.
  • With a damp clean cloth, wipe the rim of the jar clean. Place on lids and screw down the bands until resistance is met, then to fingertip tight.

Water Bath Canning Instructions

  • Place jars on a rack inside your water bath canner.
  • Make sure at least 1 inch of water is covering the tops of the jars.
  • Once you’ve got rolling boiling water, process pint jars for 35 minutes or quart jars for 40 minutes. (See notes for high altitude canning instructions.)
  • Turn off heat and remove the lid from the canner. Allow jars to rest inside the water bath for 5 minutes.
  • Using a jar lifter, carefully lift jars out of the canner and place them in a draft-free area on a kitchen towel folded in thirds. Never place hot jars on a cold countertop.
  • Allow jars to rest, untouched for at least 12 hours, 24 hours if you have the counter space.
  • Remove bands and check seals then move to the pantry for storage. (If any jars didn’t seal, store them in the refrigerator and use within a day or two.)

Pressure Canning Instructions

  • Add water to pressure canner, put in the rack, and load jars.
  • Lock the lid, bring to a boil, and allow the pressure canner to vent steam for 10 minutes.
  • Put the weight on and allow the canner to come up to 10 pounds of pressure (or use a weighted gauge, depending on your pressure canner). See notes for high-altitude canning instructions.
  • Start processing time after weight begins rocking and hissing, or dial gauge reads 10 pounds of pressure.
  • Process both pint and quart-size jars for 15 minutes.
  • Allow pressure canner to cool down naturally and for pressure to return to normal.
  • Carefully remove the hot lid and wait another 10 minutes before taking jars out of canner.
  • Using a jar lifter, carefully lift jars out of the canner and place them in a draft-free area on a kitchen towel folded in thirds. Never place hot jars on a cold countertop.
  • Allow jars to rest, untouched for at least 12 hours, 24 hours if you have the counter space.
  • Remove bands and check seals then move to the pantry for storage. (If any jars didn’t seal, store them in the refrigerator and use within a day or two.)

Notes

  • If you have enough tomato sauce to fill all the jars needed for a run in the pressure canner, I'd use the pressure canner. Food may reach a hotter temperature in the pressure canner, but because it's processed for less time, it retains more of the nutrients.
  • If you don't have enough jars to fill a pressure canner, or you don't have one, the water bath is completely fine with this recipe.
  • Even if you are pressure canning the tomato sauce, you still need to use the bottled lemon juice.
If you're 1,001 feet above sea level, you must make processing adjustments.
  • For water bath canning 1,001 to 3,000 feet is 40 minutes for pints and 45 minutes for quarts, 3,0001 to 6,000 is 45 minutes for pints and 50 minutes for quarts. For altitudes above 6,001 feet increase by an additional 5 minutes.  
  • For pressure canning, 1,001 + feet use 15 pounds of pressure.

Nutrition

Calories: 119kcalCarbohydrates: 26gProtein: 6gFat: 1gSaturated Fat: 1gSodium: 323mgPotassium: 1550mgFiber: 8gSugar: 17gVitamin A: 5398IUVitamin C: 92mgCalcium: 70mgIron: 2mg
Keyword Canned Tomato Sauce, pressure canning, Tomato, Tomato Sauce, Water Bath Canning
Tried this recipe?Let us know how it was!

Filed Under: Canning Recipes, Food Preservation, Food Preservation - Canning, Pressure Canning, Recipes, Water Bath Tagged With: homemade, More Canning, prepper, preserving, recipes, survival, tomato acid chart, tomato sauce

7 Ways to Use Medicinal Herbs at Home

September 28, 2015 by Melissa Norris 20 Comments

Learning how to use herbs in your home medicine kit is an age old tradition our forefathers and mothers knew. Seeing a resurgence in folks like you and me who want to preserve these old time remedies makes my heart warm like a hearth stone near a crackling fire.

7 ways to use medicinal herbs in your natural, preparedness, and survival medicine chest! Great list of herbs and the ways to prepare them for different ailments. Grab this now so you're ready before you need it!

If you missed part 1 and 2 of this series, you'll want to catch yourself up with 6 Old-Time Natural Remedies that Work and 7 Herbs for Natural Remedies Your Grandparents Used

It's one thing to know which herbs are good ones to start with and work well for different ailments (see posts above), but we need to know the different ways to actually use our herbs once we've identified them.

I am not a medical doctor or professional, this is not meant to treat or diagnosis, it is for educational and entertainment purposes only. If you or your loved one is sick, always seek medical care and advice from a trained medical practitioner of your choice. Never use herbs or herbal treatments without first doing research on that herb and its effects by a trusted source.

Resources for Using Medicinal Herbs at Home

No doubt about it you need a good reference guide for knowing how to use which herbs for what and the ways to prepare them.

Learn how to nourish your body with a natural medicine cabinet with items already in your spice and herb cabinet.

Grow your own culinary and medicinal herbs and learn how to easily preserve them to stock your pantry and medicine chest.

Easy guides and recipes to use your herbs in your own:

  • homemade soaps
  • herbal tinctures
  • nourishing lotions and soothing salves
  • tea

Plus our full herbal use medicinal chart. Get your copy of Hand Made: the Modern Guide to Made-from-Scratch Living by clicking here 

Beginner's Herb Guide–> Rosemary Gladstar's Medicinal Herbal Guide

Home Manual–> The Herbal Medicine-Maker's Handbook

7 Ways to Use Medicinal Herbs at Home

1. Herbal Tea. Some herbs are meant to be ingested and brewing a strong tea is a good way to do this, especially for cough and colds as a warm tea will help soothe an irritated throat like little else. Some of our favorite medicinal herbs and those recommend by readers for this method include echinacea, licorice root (7 herbs for natural remedies for the cautions of this herb), ginger, lemon, and sage.

There are a few ways to make your tea, you can use fresh or dried leaves.

How to prepare herbal tea at home 

Fresh leaves: Rinse fresh herb leaves under cold running water and place about three large leaves in the bottom of a cup. Pour hot water over and allow to seep for up to 7  minutes.

Dried leaves: A tea ball (I use this stainless steel tea ball all the time and even have put spices in it when making jams or brines) or infuser works the best when using dried leaves. Fill your tea ball with dried leaves and pour hot water over and allow to seep for about 7 minutes, or to your desired strength.

Many people like a cup of chamomile tea at bedtime.

Flavoring options:

For therapeutic use I'll put some raw honey in my warm tea if I have a cough, otherwise I prefer not to add sugar, but if it needs some sweetness, then I use a few drops of this Stevia Extract.  I don't detect any bitter or weird after taste and have been using it for over a year now, I even use it when making sauces… shhh, don't tell my kids, they can't tell the difference.

Learn how to dry  your own herbs in our Ultimate Home Food Preservation Guide

2. Herbal Poultice. This is where you take the leaves (or sometimes root of the plant) and place them into a piece of gauze or muslin, apply to the affected area (feel like I'm at work typing out prescription instructions with that one) and leave it on for the preferred duration of time.

How to Prepare an Herbal Poultice

There are two ways to make a poultice, one is using the leaves and roots raw and the other is heating them.

For the raw poultice: finely chop up the leaves/roots or use your blender and make a puree. Place this into your gauze or muslin. For a case study and more in depth look at using comfrey for this method go here. 

For a hot poultice: Take the leaves/roots and place them in a saucepan with a double ratio of water to herb (example 1/4 cup herbs to 1/2 cup water), bring to a simmer and cook for a couple of minutes. For more information on this method check out how to make an herbal poultice and compress tutorial here.

How long to leave poultice on: The time will vary depending upon the ailment and the herb, for example, mustard poultice would not be left on for a long period of time due to its hot burning nature, where as a comfrey poultice might be left on for up to 24 hours. You need to replace your poultice regularly.

You'll want to use gauze or a breathable fabric over your poultice to keep the poultice in place and to help protect your clothing.

3. Infusion or Decoction. An herbal infusion is simply an herbal tea fully matured… instead of allowing the herbs to seep for minutes, you let the tea seep for an hour, putting it on super strength. Confession: I've done this with tea simple because I forgot about it.

A decoction is when you boil the smashed or chopped herb, root, or sometimes bark in water for and allow it to boil and seep for sometime, so basically, the extended hot water bath version of an infusion.

4. Syrup. I have to say if you have children or picky finicky people in your household, then a syrup will probably be your easiest option as far as compliance goes. Medicinal syrups are shelf stable and last longer than infusions or decoctions, which means you can make them ahead of time so when you're not feeling up to par, you don't have to deal with making something, it'll be ready to go.

To make the syrup you'll start out making a decoction and then add in your sweetener. For full instructions here is a great tutorial on how to make medicinal syrups.

5. Tincture. A tincture is basically making a homemade extract, in fact, that's exactly what it is. You can use either alcohol or apple cider vinegar, though your shelf life is better with alcohol and less chance of mold. Here's how to make extract, or mint tincture, swap out any herb for different tinctures.

Tinctures can be taken by themselves, added into syrups or salves and lotions.

6. Salves, balms, creams and lotions. Many homemade salves, balms, creams and lotions, even lip balm will benefit from the addition of medicinal herbs. Usually this is done by infusing your oil with the herbs of your choice. This is a really simple procedure but takes a bit of planning ahead.

Learn more on making all of these yourself at home in the Hand Made Masterclass here

To infuse oil with herbs watch our totally FREE video training with both the traditional method and the fast I need it now method, both are easy click here to make your own herbal infused oil.

Place jar in a sunny windowsill and allow it to seep for 6 to 8 weeks, shaking every few days or so. After 8 weeks, strain herbs and keep use infused oil in recipe of your choice.

Tip: Olive oil works well for this as coconut oil solidifies at 76 degrees. I love to do this with calendula blossoms and it's the base for my Homemade Soothing Salve featured in The Made-From-Scratch Life: Simple Ways to Create a Natural Home along with other awesome recipes and tips for natural living.

Another favorite is this homemade peppermint salve for dry skin. 

7. Herbal Steams. An herbal steam not only makes your house smell wonderful while eliminating those fake chemicals in other scented options, but it has therapeutic benefits as well. I enjoy cooking on our wood stove during the winter months and also like to put a kettle of water on to act as a humidifier, but adding some medicinal herbs to the mixture will punch things up even further.

You can use any herbs you like, but for congestion both peppermint and eucalyptus are favorites, however people who are sensitive to seizures, infants, or young children should proceed with caution.

Add herbs to a pot of water and allow to lightly simmer. Or, you can add herbs to a heat proof bowl and pour just simmered hot water over it.

Want to use more old-fashioned natural remedies? Grab our Seasonal Wild Edibles Foraging Guide 

Filed Under: DIY Recipes & Tutorials, essential oils, Herbal Remedies, Natural Medicine Cabinet Tagged With: DIY recipes & tutorials, Herbal Remedies, Herbs, natural remedies, preparedness, prepper, survival

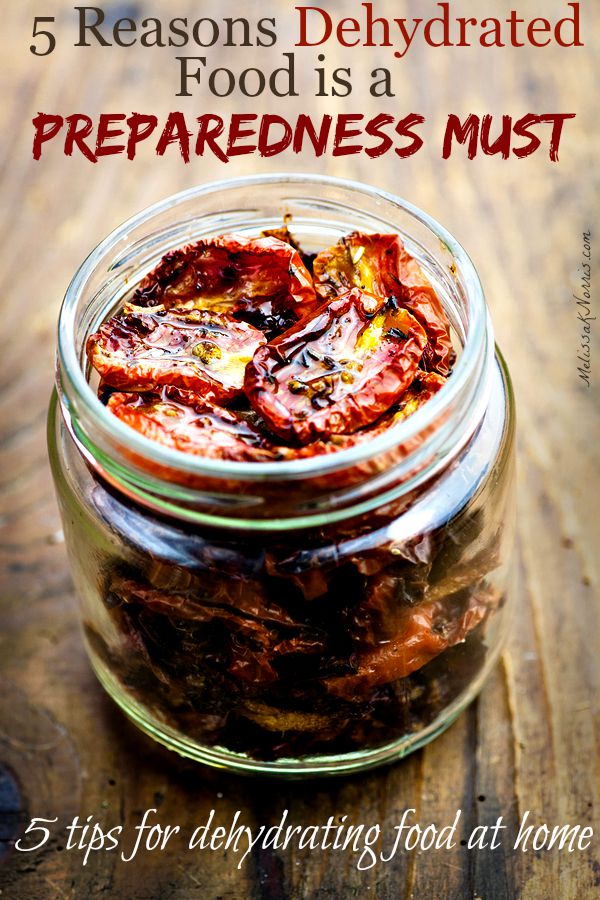
5 Reasons Dehydrated Food is a Preparedness Must & 5 Tips for Dehydrating at Home

September 20, 2015 by Melissa Norris 14 Comments

Want to be prepared with food storage that is portable and doesn't take up much space? Learn how to dehydrate food at home (awesome free guide that covers dehydrating everything, did you know you could dehydrate liquid at home?) Grab this now!

Dehydrating food is an excellent way to preserve your food, build your own pantry, cut down on your food bill, and up your preparedness level. In fact, dehydrating could be called the prepper and survivalists top food preservation mode.

Benefits of Dehydrated Food for Storage

Removing the moisture from food allows it to store indefinitely in proper conditions, making it a preferable choice for the preparedness minded individual. Smoking is another form of dehydrating food and creates delicious meats and cheeses, as well as preserving them. Learn how to smoke cheese at home here.

Dehydrating allows you to harvest your food in season and preserve it for year round eating. From foraging, to harvesting from your garden, or even purchasing food in season, dehydrating lets you build your own food supply for year round use. Note: Dehydrating or freezing is the only safe way to preserve wild mushrooms as canning is not recommended for wild mushrooms.

One of the beauties of dehydrating food is its portability and ease of storage. When all of the moisture is removed from the food, it shrinks up considerably. This is done either through salt or the movement of cold or hot air through the food. Because organisms that cause food spoilage need moisture to grow, dehydrating them makes the food a perfect candidate for long term food storage. Plus, unlike a freezer, dehydrated food requires no electricity to maintain its stability.

Check out this, when dehydrated, one pound of fresh apples becomes just two ounces. Each food will vary on the how much it shrinks down, but you can see why dehydrated food quickly becomes essential when you’re on the go or for bug out bags. Some dehydrated foods needs water for reconstitution, but many items can be eaten as is, which is ideal in emergency situations.

Fruit leather, strawberries, grapes, blueberries, apples, peaches, pears, bananas, pineapple, and zucchini chips are all easily eaten without reconstitution or the need to soak in water. Plus, they’re quite delicious and packed with nutrients.

While I love home canned food for many reasons, you can’t beat dehydrated food for the ease of carrying or storage. From meals on the go, to hiking and camping, in your emergency bag or extended times in the wilderness, you can pack much more dehydrated food than any other form. Dehydrated food requires no refrigeration and very little storage space. It can easily fit in backpacks, purses, or pockets.

Resources for Dehydrating Food at Home

Drying food is one of the old traditional methods of food preservation known to man. In hot climates, food can be dehydrated simply by laying it out in the sun on a screen or rack. A solar Sun Oven (which I'm so grateful Sun Oven sent to me in exchange for my review, because I was skeptical of it working in the Pacific Northwest where sun isn't something we have a lot of, but it has quickly become my new favorite toy) is also an off-grid dehydrator!

Off-grid dehydrator–> Solar Sun Oven and Preparedness Accessories 

Frugal dehydrator–> Nesco Dehydrator It's 42% off at the time of this posting!! I purchased this dehydrator two years ago when my garage sale one bit the dust and have been very happy with it.

I'm never buying another dehydrator again–> Excalibur Dehydrator

5 Tips for How to Dehydrate Food at Home

For optimal long term storage, dehydrated foods should be stored in a dark cool area in an airtight or vacuum-sealed container. Pantry shelves or cupboards work well, but under beds or anywhere out of direct light is fine.

Grab your free copy of the Ultimate Home Food Preservation Guide

The foods you can dehydrate are limitless, from fresh fruit, vegetables, herbs, to meat, and even liquid. You can make your own soup mixes, fruit leather, jerky, beans, onion and garlic powders, powdered cultures, to powdered eggs. Grab access to all of our free tutorials for dehydrating to build up your home food storage and sign up here!

Canning tomatoes? Save the skins you'd normally discard and dehydrate them, then grind up into a tomato powder for use later in sauces and soups.

There are many options for dehydrating your food from hanging meat on racks next to a warm outdoor fire for smoking, to racks indoors next to your wood stove, and in your oven if it goes down to 150 degrees. You can dry herbs by hanging them upside down in bunches in a dry warm area for about a week.

When dehydrating your food, the biggest tip is to chop or slice all of your food as close to the same size as possible. The more uniform, the more they’ll dry at the same rate. An easy way to do this is to use a mandolin. Another option is a food chopper for items that need to be chopped or minced instead of sliced.

Want to be prepared with food storage that is portable and doesn't take up much space? Learn how to dehydrate food at home (awesome free guide that covers dehydrating everything, did you know you could dehydrate liquid at home?) Grab this now!

Think about how you want to use the food before drying. If you’re drying apples, do you want apple rings to eat as snacks, or wedges to use in pies and desserts, or chunks to add to oatmeal? You might decide to dry some in all forms, but thinking it out ahead of time will be key.

Place your food on the dehydrator trays. Make sure none of the food is touching one another. You want the air to be able to circulate all the way around each piece. Fruits don’t put off much odor, so you can dry different fruits at the same time.

Strong odor items like onions and garlic should be dried by themselves or you’ll have onion flavored strawberries. Some folks will put their dehydrator outside or in the garage when drying onions and garlic if the smell is too strong.

Select the appropriate setting on your dehydrator. Be sure to check on the food periodically throughout the drying time. You’ll want to rotate trays, especially if one tray is drying faster than the others.

Use the manual times as a guideline as the time it takes to dry your food will vary upon your climate, how thick you cut the food, and how much water it had in it to begin with. For storage purposes, you can’t over dry your food. The drier, the longer it will store. Some people prefer their fruit to be dry but still flexible, while others prefer it on the crisper side.

Once your food is dried to your liking, you’ll want to package it. You can place them in Mason jars and use a vacuum sealer attachment to make it air tight. You can use mylar or vacuum sealer bags. Another option is to double bag Ziploc bags and squeeze as much air out as possible. Be sure to always mark your containers with the date for proper food rotation in your pantry.

Learn how to dehydrate fruit at home to save money and build up your food storage. This simple tip will cut hours off your dehydrating time. Grab this now to preserve the summer berry and fruit harvest.

To reconstitute vegetables, soak them for 10 minutes to 2 hours, but no longer, as they can start to spoil if soaked too long. They’ll return to almost fresh state and cook as you would regularly.

Want to save hours and days of drying time when dehydrating berries? Here's our complete tutorial on How to Dehydrate Berries the Easy Way. 

Filed Under: Dehydrating, Food Preservation, Homestead-Life, Preparedness/Survival Tagged With: dehydrating, Home food preservation, preparedness, prepper, survival

How to Preserve Basil in Salt

May 20, 2015 by Melissa Norris 40 Comments

Want the fresh taste of basil for months on end? Use 3 ways to preserve basil in salt in minutes. I can't believe how easy this is!

Learning how to preserve basil in salt isn't something I knew I needed to know how to do until now. Seriously, where has this been all my life? Fresh basil and savory tinted salt, all in one jar, all ready to marry up with my meats and sauces. 

I had no idea you could preserve basil in salt, bacon and ham, yes, fresh herbs, never thought about it. My culinary side met my homesteading side and I knew this was a match made in heaven. In heaven ya'll. Because my southern roots come out when I'm really excited.

Shelle graciously agreed to write us up a post on how to preserve fresh herbs in salt, not one way, but 3!! Yes, triple time coolest thing ever.

Resources for How to Preserve Basil

Kosher or Sea Salt

Wide-mouth Mason Jar

Fresh Basil

How to Preserve Fresh Basil in Salt

Salt has been used for centuries to dry and preserve foods. It pulls out the moisture from herb leaves and preserves the original flavor. Salt also inhibits the growth of microorganisms by drawing water out of microbial cells through osmosis. Concentrations of salt up to 20% are required to kill most species of unwanted bacteria.

This preservation method works best on certain moist and tender herbs that are hard to dry. Herbs like basil and cilantro, that either mold before they are dry, or that dry to a flavorless leaf that does not resemble the freshness you are looking for.

In all cases, start this project with freshly picked herbs that have been cleaned and thoroughly dried. Store your finished herbal mixture in a clean glass container with a tight fitting lid. When using, always use a fresh, clean spoon to reduce introducing contaminates into your herbed salt.

What kind of salt?

I recommend either sea salt or kosher salt, but canning & pickling salt will work too. These are considered food grade and are courser than regular table salt. Using table salt is acceptable, but it should not contain iodine, which will darken the herb leaves.

Here’s the best answer I could find from the Penn State Extension office:

“Table salt is used for baking, cooking and normal table use. However, it is not recommended for canning recipes because the calcium silicate may cause clouding or settle to the bottom of jar. Furthermore, the iodide may discolor some foods. Neither of these effects makes the food harmful to eat. However, the visual quality of the product is adversely affected.

Canning and pickling salts do not contain potassium iodide, dextrose or calcium silicate and thus can be used for cooking, baking, canning, pickling as well as for the table. Because anti-caking agents are not added, it may form lumps in humid weather or if exposed to moisture and should be stored in an air-tight container or re-sealable plastic bag. Kosher salt is usually pure salt and thus is also appropriate for pickling and canning. However, check the label to make sure it does not contain additives.”

http://extension.psu.edu/food/preservation/faq/canning-and-pickling-salt

3 Ways to Preserve Fresh Herbs in Salt

These three methods are so east you will never need to buy herbed salt again!

Preserve fresh herbs in layers of salt

1. Alternating layers of fresh herb leaves and salt

This is by far the easiest method. In a clean glass jar add a layer of salt to cover the bottom. Add herb leaves in layers, alternating with the salt, until the container is full. Refrigerate.

The leaves will stay surprisingly fresh and flavorful for months. To use, just remove a leaf and brush off the salt. As an added bonus, the salt will become flavored over time and can be used in cooking too.

http://preparednessmama.com/preserve-basil
Grind and dry method of preserving basil with salt

2. Grind & Dry Method

Use a ratio of 1 part herbs to 4 parts salt for the grind and dry method. Clean and dry fresh herbs and chop them into small pieces until you have 1/4th of a cup. Place them in a blender or food processor and add 1 cup of salt. Process until they are completely incorporated.

Lay the mixture out on a baking sheet and cover with a cloth, keeping it out of direct sunlight. After a day, place the mixture into a clean glass jar and cap tightly. Keep in the refrigerator until needed. It will last for one year.

How to Preserve Homegrown Herbs with Sea Salt: In the Pantry
chop and stir method

3. Chop & Stir Method

Use a ratio of 4 parts herbs to 1 part salt for the chop and stir method. Clean and dry fresh herbs and chop them into small pieces. You can add them to a food processor, coffee grinder, or glass bowl.

Add one part salt to the herbs, pulsing in the food processor for about 30 seconds. This will create a distinctly herb smelling salt that will take on the color of your herb. It is the most fragrant of the herbed salts we are making today.

Store your mix in the refrigerator and remove as needed. It will last for at least 6 months.

http://foodpreservation.about.com/od/Salting/r/Cilantro-coriander-Salt-Recipe.htm

Which herbs work well for this method?

  • Basil
  • Celery Leaf
  • Cilantro
  • Chives
  • Dill leaf
  • Lemon balm
  • Parsley
  • Rosemary

You can use it anywhere you would use herbs and salt, just replace the amount of salt required in the recipe. Consider using it in spaghetti sauce, stuffed fish, soup, savory baking, bread or rubs. Luckily, there are no hard and fast rules so experiment with your own herbal salt blends and enjoy!

PreparednessMama is Shelle Wells – busy mom, wife, preparedness enthusiast and blogger. She gave up her (boring) bookkeeping job for something better. She likes family history (when she has the time), action movies (which she should give up for family history), canning, preserving food, and gardening- she dreams about growing things!

Shelle recently traded her garden in the Pacific Northwest for one in Central Texas, where she's learning a whole new way of gardening. Find her gardening and canning adventures over at www.PreparednessMama.com

Filed Under: Food Preservation, Food Preservation - Other Tagged With: how to, prepper, preserving, self-sufficiency, survival

5 Preparedness Tips You Need to Do Now

September 22, 2014 by Melissa Norris 10 Comments

Being prepared is something a lot of folks think about after the fact, or when you watch a news clip about a disaster somewhere else. Preparedness is a lifestyle for us, and not because we're getting ready for some type of Doomsday disaster.
I believe in being prepared for more likely events, like long power outages (we went almost 2 weeks a few years back), extreme weather, financial hardships, or being unable to get to grocery stores. Plus, I enjoy learning traditional skills and merging my modern life with that of the pioneers.

In honor of this amazing giveaway we have going on, like I want  half of  okay, everything listed. Here's my 5 preparedness tips you need to implement now.

1. Create a food storage of some type. Not sure where to get started or feel overwhelmed? Here's are my 8 Foods You Should Be Storing and How. 

2. Make sure you have means of cooking your food without power, 11 Ways to Cook Off-Grid Without Power will get ya started, and also be sure you have a way to heat your home. We use a wood stove and it also provides us with a means to cook, but figure out someway, even if it's lots of layers of clothes and blankets, to keep warm.

3. Have water or a means of getting clean water. Seriously, this is an area most of us could do better. Have you ever tried to go without turning on the faucet for a full day? It's a good thing to practice to see how much water we use and a means of making you up your water plan. The Berkley in the giveaway is a great way to get started.

4. Have a light source. In the winter months especially, you'll need some way to see once the sun goes down. We keep an oil lamp and oil on hand as it doesn't require batteries or light bulbs to be replaced. It puts off more light than a candle. Bonus, it looks super cool as part of our rustic vintage decor too. Here's the lamp we have this exact model Lamplight 110 Chamber Lamp

5. Know Jesus. This is going to make some of you mad or be like, what, seriously? And yes, seriously. We can be prepared as we want, but fact is, we're all going to die. Most likely, we won't know when. After going through a deadly mudslide in our neighboring town I believe Jesus should be our number one preparedness priority, because we can't plan when we die, only where we'll go. 

In honor of this month being Preparedness Month, The Prepared Bloggers are proud to present a Mega giveaway. ***Contest Closed***

We are proud to partner with 6 great companies for seven great prizes. These prizes are
the perfect way to either begin your preparedness journey or add to your preps. We will
have seven winners in this giveaway. Each winner will win one of the following
prizes listed below. The giveaway starts September 22nd, 2014 @12:15 am (CST) and ends
September 29th, 2014 @ 11:55 pm (CST). This giveaway is open to anyone 18 years of age
and older who is a US resident of the 48 Continental US States only. Each winner will be
sent an email and the winner must respond within 24 hours or another winner will be
chosen.

1 Royal Berkey System–From LPC
Survival
–This system is perfect for 2-6 people, filtering 3.25 gallons in
about 2 hours. It comes with 2 Black Elements and is perfect for large families but is
small enough for travel.

sun-oven

1 Sun Oven–From Sun Oven–This is a
great off-grid cooking solution using only solar energy. This Sun Oven includes a
cookbook, dehydrating and baking rack set, two easy stack pots, a WAPI, and two loaf
pans.

new-kelly-kettle

1 Scout Kelly Kettle–From Kelly Kettle–The Kelly Kettle boils water
quick and with very little fuel. It's great for camping trips, hunting trips and
emergencies.

grainmill

1 Wonder Junior Deluxe–From Wonder Mill–This is the perfect solution for
making your own bread off-grid. It's one of the easiest to use hand mills on the market.
A great mill to use in an emergency situation, an off-grid environment or for everyday
use.

propur

1 Propur Big with 2 ProOne 7″ G2.0 Filters–From End Times Warehouse–A clean water supply is
super important in every situation. This gravity fed water treatment system makes it
super easy to always have clean water.

2 Seventy Two Hour Kits–From Survival
Based
–Be prepared for a sudden storm or power outage with this all in one 72
hour kit. Complete with fuel to cook the food contained in the kit. Keep this kit in your
car, house, or grab it if you need to evacuate. Two lucky people will each win one 72
hour kit.

Cox-Honey-two

1 Case of Six 5lb Creamed Honey (30lb total)–From Cox's
Honey
–Honey is the prefect item to place in you food storage. It's also great
for a number of other uses. Cox honey is raw and unfiltered making it some of the best
honey on the market.

Thanks again to all of our sponsors.

Enter below

a Rafflecopter
giveaway

sep giveaway two


Filed Under: Homestead-Life, Preparedness/Survival Tagged With: preparedness, prepper, survival

8 Foods You Should Be Storing and How

September 1, 2014 by Melissa Norris 78 Comments

8 Foods You Should Be Storing and How

Everyone knows we should be storing some kind of food in our home pantries for both emergencies and preparedness. But how do you know where to start or which foods to store? I see lots of lists on foods folks think you should be storing for your long term food storage. Some of them I agree with, but a lot of them, they're not practical.

I don't believe in storing food you don't use in your regular life. Why would you invest money and storage on something you're not using? That makes no sense to me. Plus, if an emergency does hit, you don't want to be adding to the stress of the situation by trying to figure out how to cook and use something you've never used before.

[Read more…]

Filed Under: Frugal Living, Homestead-Life, Lifestyle Tagged With: food storage, prepper, survival

How to Grow Swiss Chard in your Fall Garden

August 20, 2014 by Melissa Norris Leave a Comment

Grow Swiss Chard in Your Fall Garden. I'm so excited to grow a fall garden this year and increase our growing season. Great tips on sowing swiss chard, how to grow it, and way to even eat the stalks!

I don't know about you, but if I don't know how to do something, I'm not shy about asking. Because no one knows it all right? Between you and me, if someone does seem to know it all, I usually don't like to hang with them for very long.

While I'm a pretty old hand at gardening, there is a lot I'm still learning. And one of those things is increasing our fall vegetable garden. These 5 Plants to Grow Now for a Fall Harvest are some of my favorites, but I knew there had to be more veggies I could put in. (P.S. Did you catch our Planting a Fall Garden Podcast? It's packed full of tips for putting in your fall garden, cooling the soil, and using the frost to your advantage)

[Read more…]

Filed Under: Gardening, Raising Your Own Food, Vegetables Tagged With: fall garden, gardening, prepper, survival, Vegetables

8 Tips to Keep Sane when Preserving the Bounty
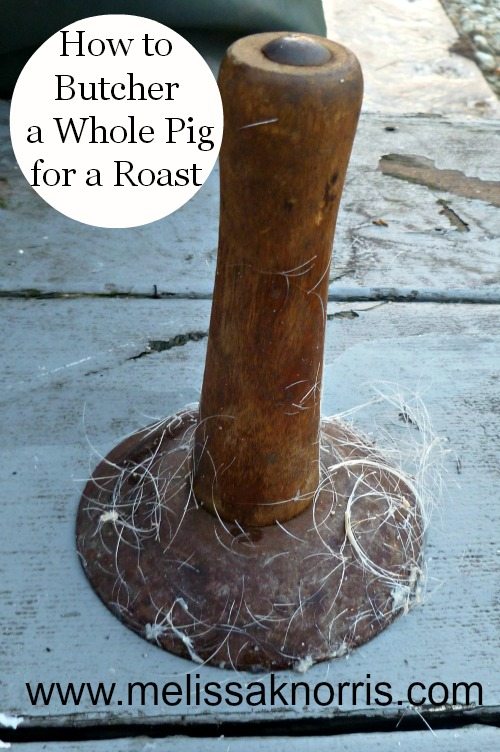
August 18, 2014 by Melissa Norris 8 Comments

Of all the things we do on our homestead, preserving the harvest is one of the most crucial parts to our self-sustainability and old-fashioned pioneer roots. It's also one of the ways we keep our food bill down. In the long run, it keeps our health bills down, too, because the food we put up at home is done at the peak of freshness and when grown by us, heirloom and organically.

8 tips to keep sane when preserving the bounty. During peak canning season I always feel behind, these are some great tips to remember. Plus, the food saver and canner giveaway would be awesome to win.

You might say I'm a little bit in love with preserving food at home. And my husband is totally okay with my other “love”. In fact, he encourages and even helps… yea, he's pretty awesome that way.

[Read more…]

Filed Under: Food Preservation, Food Preservation - Canning, Homestead-Life, Lifestyle Tagged With: Giveaway, More Canning, prepper, preserving, preserving food, pressure canning, survival

5 Vegetables to Plant Now For a Fall Harvest

August 6, 2014 by Melissa Norris 6 Comments

5 Vegetables to Plant now for a fall harvest. Great list of vegetables to put in now to extend the growing season, plus which ones to sow from seed and which ones should be transplants. I'm sowing some more seed tomorrow

There's nothing as good as harvesting home grown vegetables from your own backyard. One of my favorite things about summer is having a free grocery store next to my house. Growing up and the first years of our marriage we planted our garden the end of May and wound up the harvest by the first of October.

Our food bill went down considerably and we naturally ate more vegetables than any other time of year. As I became more of a garden and determined to live a self-sustainable lifestyle, I really wanted to be able to grow more of our food year round. The cooler and somewhat normally soggy temperament of the Pacific Northwest seemed to make that out of the question. Do you see my extreme pouty face?

If I only planted warm weather or summer crops, the above statement is true, but cool weather and root crops, now these are a whole ‘nother story. And I love stories that take me by surprise, how about you?

Cool weather crops are sometimes grown during the summer months around here, especially in places with cooler or more mild summers, but they really thrive in the early spring and fall.

The trick, you need to plant them now in order to harvest them this fall. Seems kind a weird, right, you plant during the hottest part of the year, in the dead smack middle of summer for fall? Yep, you do.

These are some of our favorite fall and cool weather crops to grow. Depending upon your first hard frost date, you might be able to sow some of these up into September or about 4 weeks before your first hard frost. Our's is typically the tale end of October or first of November.

These are 5 vegetables to plant now for a fall harvest.

1. Carrots. Carrots are an excellent fall crop. If your winters aren't extreme, you can even leave them in the ground and cover them with a layer of straw or mulch. Plus, you get to make carrot cake and carrot muffins and baked carrots and… yea, I kind of like carrots. Carrots are best sown by seed on top of the soil. Keep soil moist until they germinate and thin once they greens are a few inches tall.

2. Beets. Beets are something I developed a taste for as an adult. But they're like carrots, you can keep them in the ground or store them in the root cellar. They're super yummy pickled, roasted with garlic, or in my Chocolate Gluten-Free cake. I might have a thing for vegetables and dessert. Here's our complete tutorial on how to plant and grow beets.

3. Parsnips. I love roasted parsnips with a bit of butter and garlic. Like I will eat the entire pan by myself, in one sitting, without sharing unless I really absolutely have too.

4. Cabbage. Oh, cabbage, I love you stuffed and rolled, shredded in a slaw, and fried in butter with some sausage. Cabbage is one you should plant using seedlings. If you don't have any started, many nurseries and stores will have seedlings for sale this time of year.

5. Kale. How did I live over two decades without knowing about kale? We adore kale. It's super easy to grow. Sow it by seed on the top of the soil either in rows or scatter it for a cover crop. These kale chips are so good my son even questioned if they were actually a vegetable.

What are your favorite fall crops? Do you grow any crops year round?

Interested in growing more vegetables into fall? Learn how to cool your soil during planting, which crops to sow from seed, harvesting tips, and how to use the frost to your advantage.

Planting a Fall Garden Now. Learn how to plant now for a fall harvest, seed sowing, how to cool the soil, and tricks for using the frost for your advantage.

Filed Under: Gardening, Raising Your Own Food, Vegetables Tagged With: gardening, prepper, survival, Vegetables

  • 1
  • 2
  • 3
  • Next page
Melissa K. Norris

Follow me:

  • Start Here
  • Courses
  • Academy
  • Contact
Log In

Articles

  • Gardening
  • Homesteading
  • Recipes
  • Lifestyle
  • DIY

Podcast

  • Beginner Gardening Secrets You Need to Know – Q & A
  • Must-Have Homestead Kitchen Items for Easier From Scratch Cooking
  • Science-Based Companion Planting Strategies for a Healthier Garden
  • What To Do When Your Family Isn’t Onboard with Homesteading (Or Something You’re Passionate About)
  • Raising Backyard Chickens

Books

  • The Family Garden Planner
  • Hand Made
  • The Made From Scratch Life
  • The Family Garden Plan

Education

  • Organic Gardening Workshop
  • Home Fruit Preservative Canning e-course
  • Home Canning With Confidence
  • Homemade Bread & Baking Class
  • Natural Homemade Bath and Beauty
  • Pioneering Today Academy

Copyright 2021 - Melissa K. Norris Pioneering Today LLC

  • Privacy Policy
  • Affiliate Disclaimer
  • Terms of Use

Melissa K. Norris and Pioneering Today LLC is a participant in the Amazon Services LLC Associates Program, an affiliate advertising program designed to provide a means for sites to earn advertising fees by advertising and linking to Amazon.com.