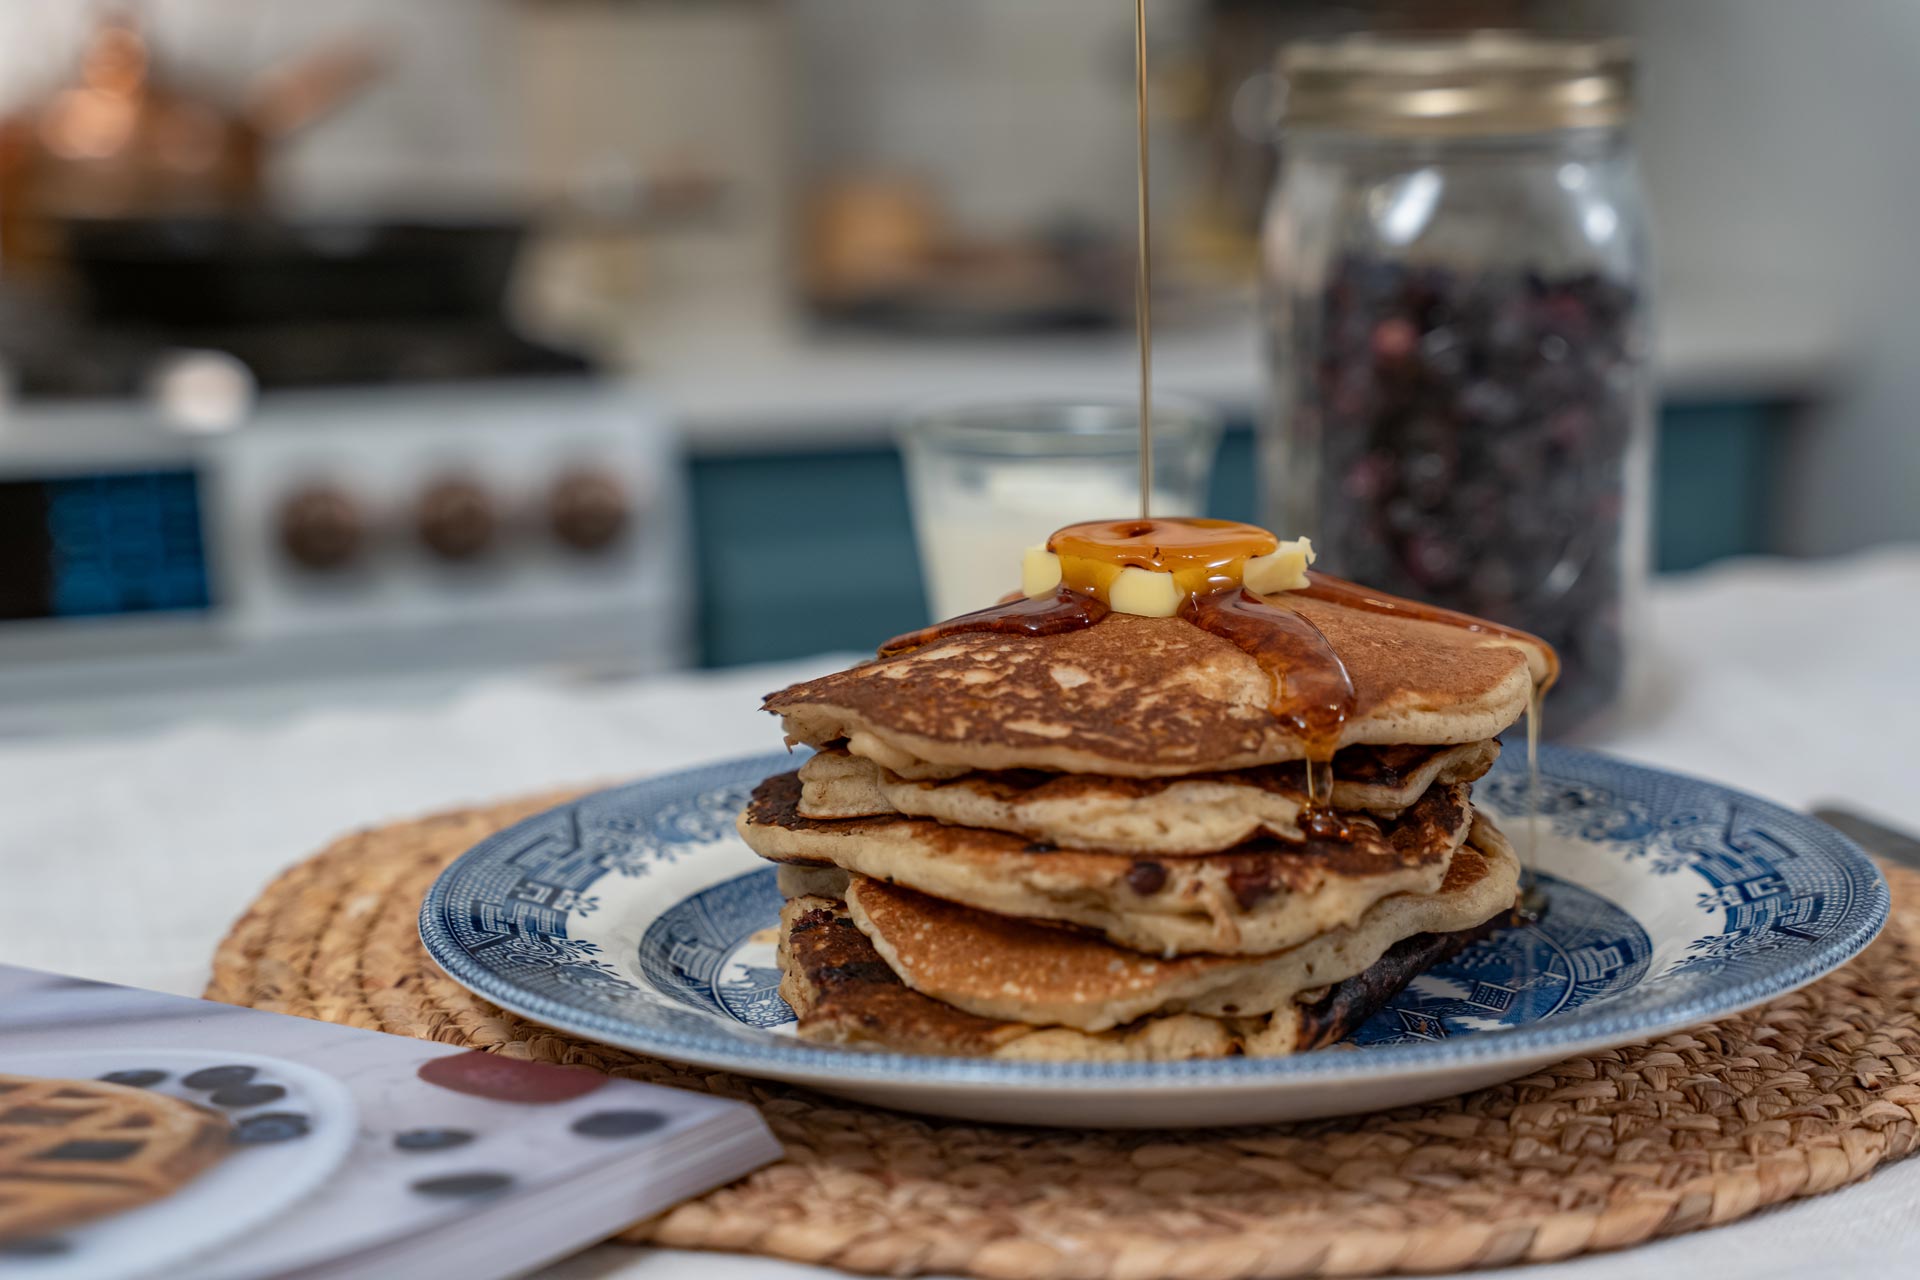
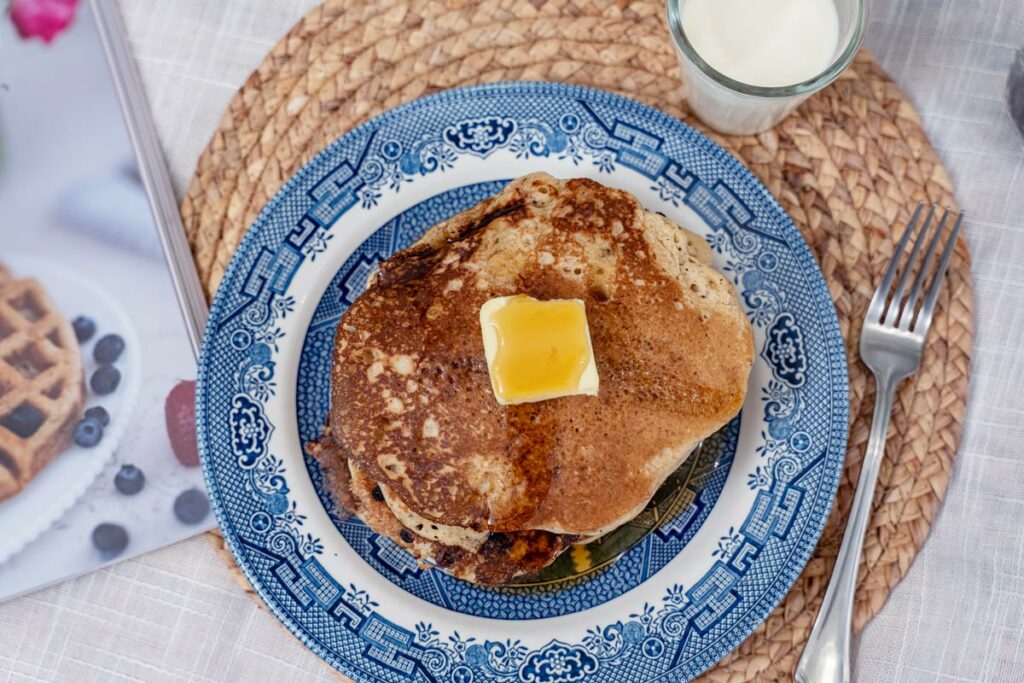
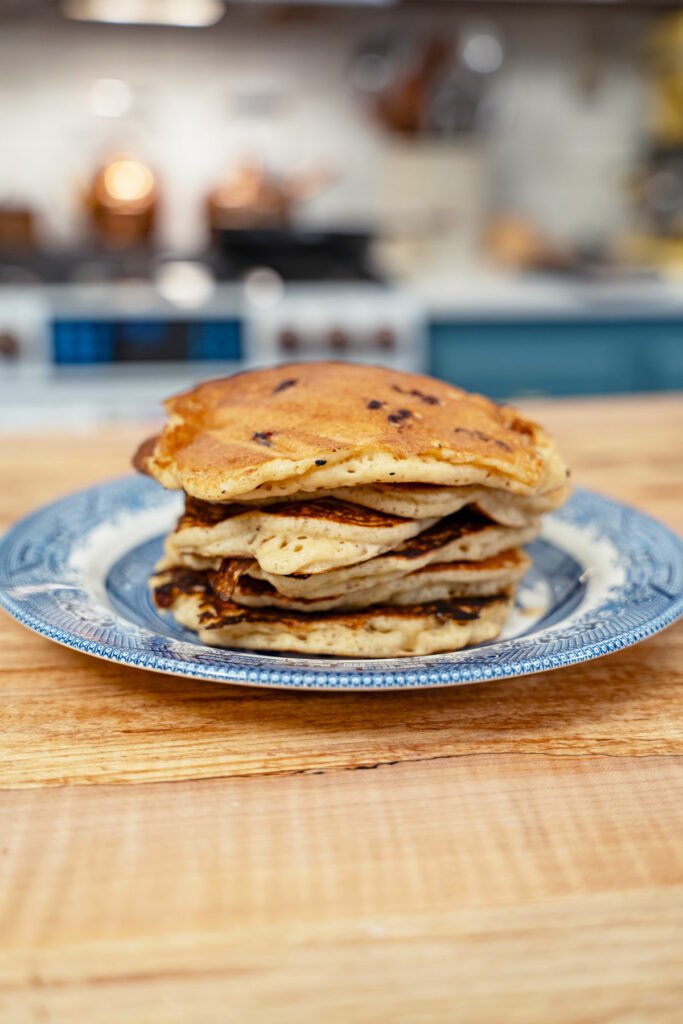
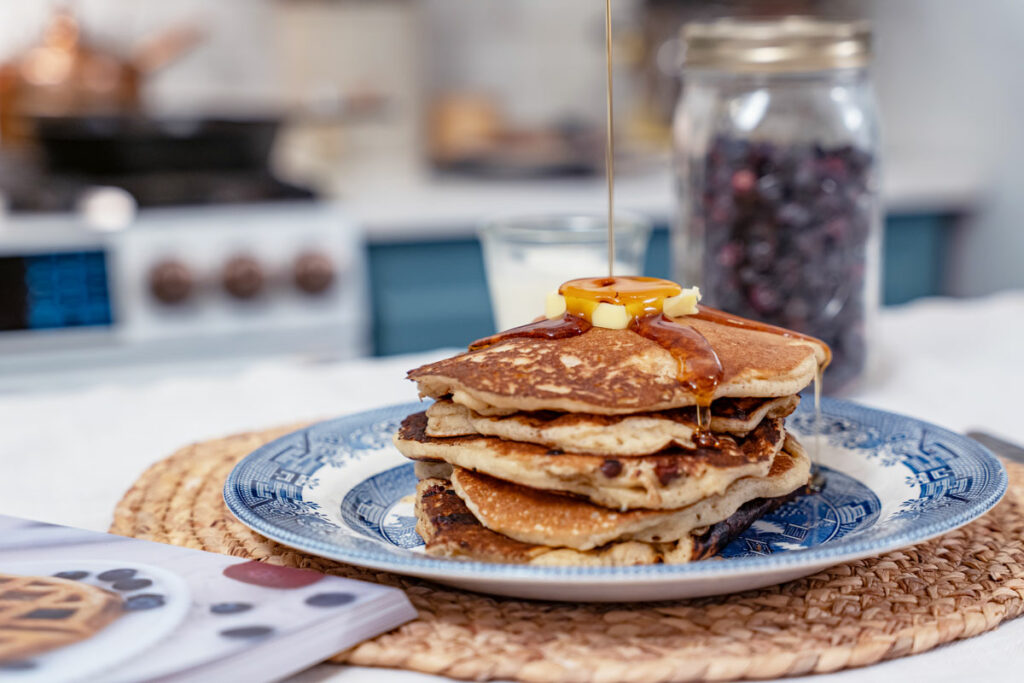
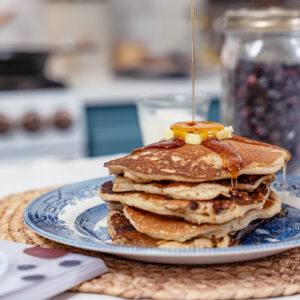
Ready to make the best sourdough discard pancakes ever? This easy one-bowl recipe makes delicious golden brown fluffy sourdough pancakes that will not disappoint! Just a handful of basic ingredients and your favorite cast iron skillet is all you need. Top with butter and maple syrup, and enjoy this quick breakfast.
You all know that I love a good homemade breakfast, but I'm not about to slave away in the kitchen every day to get it done. That's why I love utilizing homemade mixes or quick and easy recipes that can be made in less than 15 minutes to get the job done.
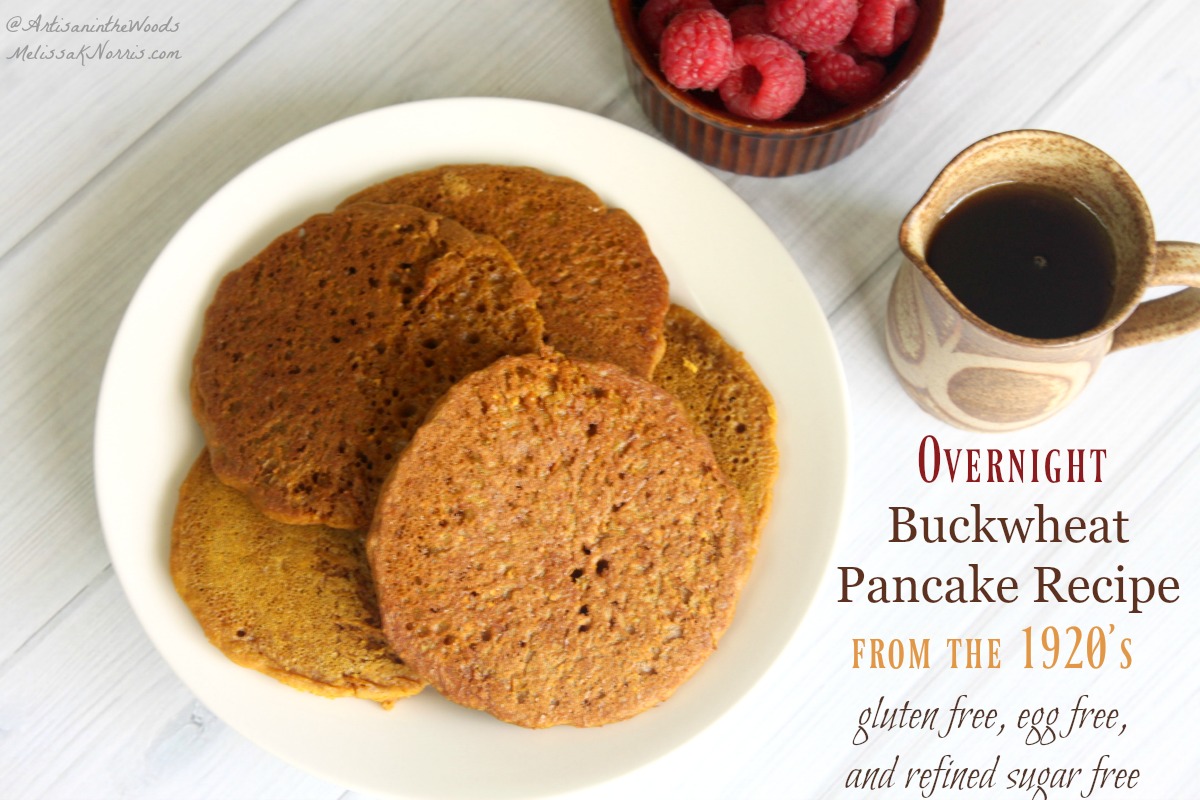
Some of my favorites are my homemade pancake mix recipe, homemade muffin mix recipe, easy instant oatmeal recipe and this biscuit mix recipe. I also love these buckwheat pancakes or this blueberry cake (yes, cake for breakfast!).
Why You'll Love This Recipe
Who doesn't love a recipe that can be mixed up in minutes, all in one bowl, and uses up that sourdough discard you've been wondering what to do with? You know I do! But those aren't the only reasons you'll love these homemade sourdough pancakes...
- Quick - With five minutes of hands-on time, you'll be flipping these pancakes on the cast iron skillet. Depending on the batch size, you could have breakfast ready in just ten minutes! This means you can make this pancake recipe on a busy weekday morning or save it for those special Saturday morning breakfasts. Plus, it's such an easy go-to sourdough discard recipe!
- Simple - Just ten ingredients that you likely already have on hand, and you're on your way to a delicious breakfast everyone in the family will love.
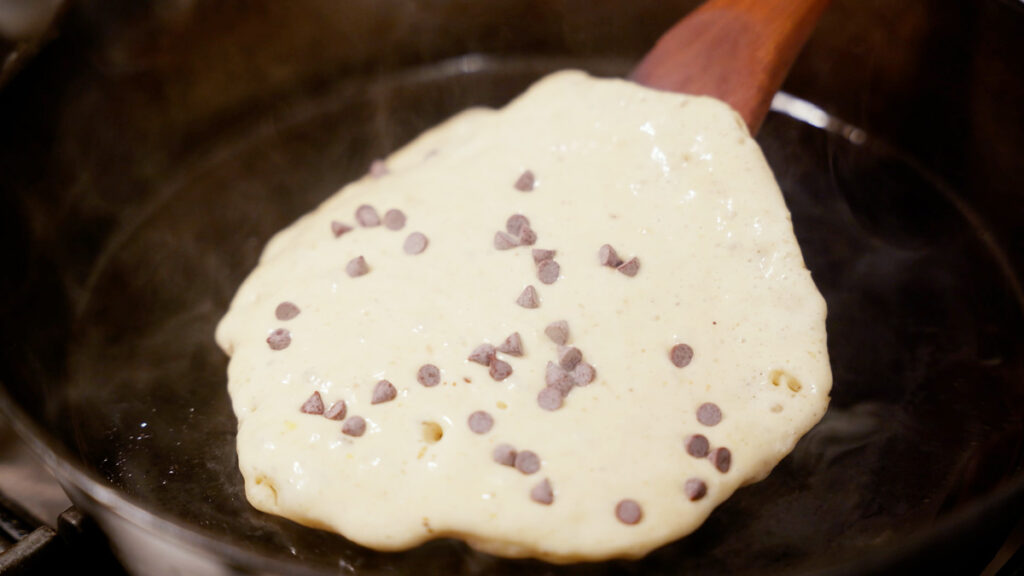
- Customizable - Want chocolate chip pancakes? Easy, just add mini chocolate chips after you pour the pancake batter into the pan. Does someone want blueberry pancakes? Simple! Have a bowl of frozen blueberries ready to top the pancakes after you pour the batter into the pan. Have you tried savory pancakes? Mix in some cooked and crumbled bacon or sausage! By topping each individual pancake with the optional add-ins, you can customize each pancake with barely any extra effort.
- Make Ahead - This recipe can be made the night before and be waiting and ready in the refrigerator. The only thing you'll need to change is not to add the baking soda when mixing the ingredients together. Rather, save that and add it in the morning. You'll notice the batter will get a bit bubbly once you add it. Mix it quickly (but don't over-mix) and start baking the pancakes right away.
Tips for the Best Sourdough Discard Pancakes
When making sourdough pancakes, there are a few tips that you'll want to make sure you do so you can have the most fluffy and delicious pancakes every time...
- Temperature - Finding the right temperature for your pan and stove isn't always the easiest. My tip is to do a test pancake and make necessary adjustments (like turning the heat down to medium-low if pancakes are cooking too quickly or burning) or adding more butter or oil if needed. Once you find the sweet spot, I like to jot it down right in my recipe book so next time I make this recipe I remember! If you're looking at this recipe on your phone, feel free to print it out and store it in a kitchen recipe notebook, along with your notes about cooking temps, etc.
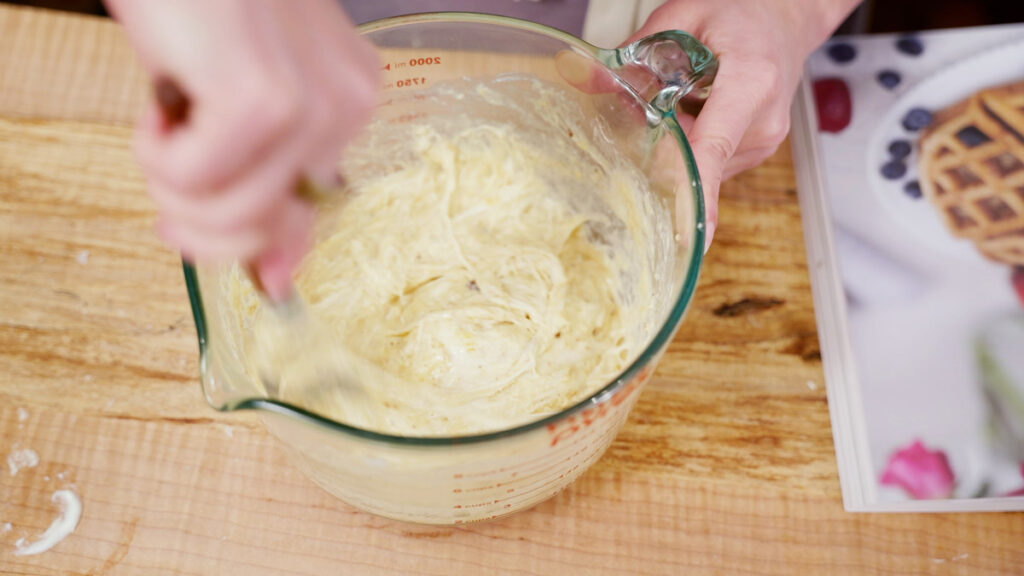
- Don't Overmix - It's tempting to continue mixing the batter until you're certain everything is incorporated. Since we're using baking soda and sourdough starter, those are the magic ingredients that will give your pancakes their fluffiness. If you overmix the batter, you'll end up with flat pancakes (they'll still taste delicious; they just won't have as many air bubbles!).
- Use a Whisk - Using something like a dough whisk can help avoid over-mixing. You can absolutely use a wooden spoon or spatula, but if you're not sure how to mix without over-mixing, a whisk can help.
- Keep Pancakes Warm - If you want the whole family to sit down and enjoy breakfast together (or maybe you're cooking for a crowd), utilize the warm setting of your oven to keep the pancakes warm until the whole batch is done cooking. Just make sure to use a pot holder when removing your plate, casserole dish or baking sheet, as it could also get quite warm! Cover pancakes with a piece of foil to keep them warm.

Subscribe to Melissa K. Norris!
Get updates on the latest posts and more from Melissa K. Norris straight to your inbox.
We use your personal data for interest-based advertising, as outlined in our Privacy Notice.
Home & Hand Made
This sourdough discard pancake recipe is featured in my book Home and Hand Made. If you love from scratch cooking and easy yet cozy homestead meals, this book is for you. Grab your copy and start cooking up delicious recipes in your kitchen today.
How to Make Sourdough Discard Pancakes
Supplies Needed
- Mixing Bowl - A two-quart mixing bowl will be large enough (unless you're doubling the recipe).
- Measuring Cups & Spoons - Measuring accurately will give you the most consistent results.
- Wooden Spoon or Whisk - We don't want to overmix the batter, so use a dough whisk to mix ingredients thoroughly without overmixing them.
- Skillet - You know I love my cast iron! But any skillet will do (if you have an electric griddle, you can cook up a bunch of pancakes at a time!).
- Spatula - Grab yourself a flat spatula so flipping your pancakes is easy. You don't want to be tearing into your pancake trying to get it to flip!
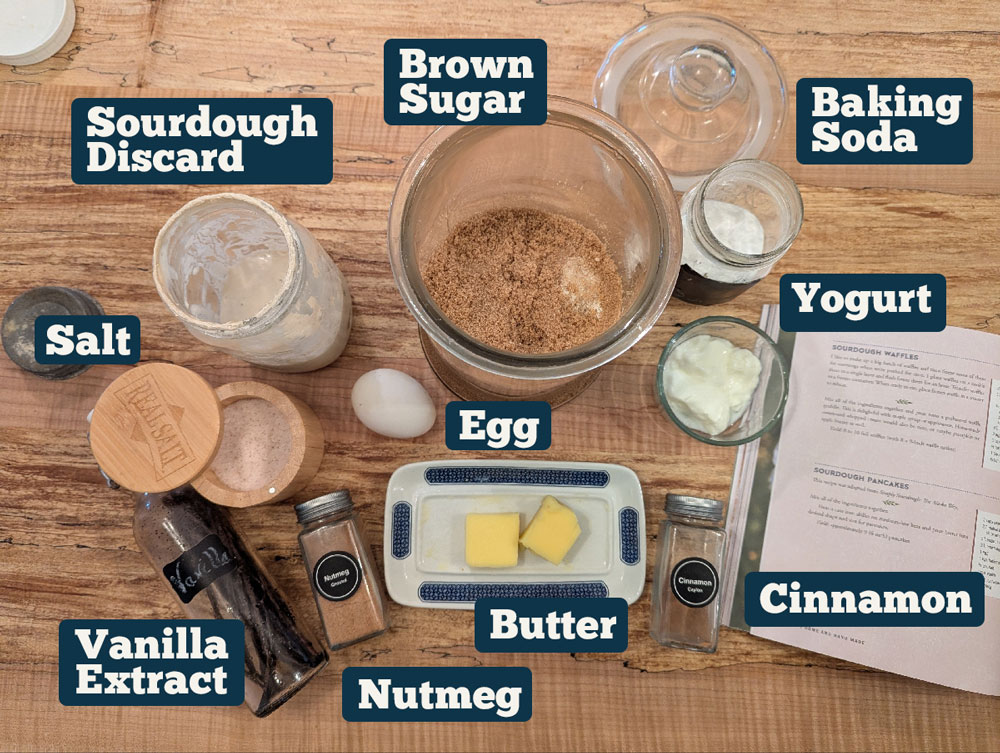
Ingredients Needed
- Sourdough Discard - If you don't know what sourdough discard is, then give this easy pancake recipe a try (or these buckwheat pancakes). Or, you can learn how to make a sourdough starter here. Your starter does not need to be active or recently fed. In fact, this recipe works best if your starter is ready for its next feeding or has been sitting in the refrigerator as a sourdough starter discard.
- Butter - You'll want melted butter for this recipe. Melt your butter ahead of time and allow it to cool before mixing into the batter. You can also use melted and cooled coconut oil or ghee for a dairy-free option.
- Egg - We're using a whole egg here. Some recipes call for whipping the egg whites to add more fluffiness. While this is a great option, if you're in a rush this isn't a necessary step.
- Brown Sugar - I'm using brown sugar (and yes, that is a piece of bread in the jar... it helps the brown sugar from clumping or becoming solid!), feel free to use white sugar. If using a liquid sweetener like honey or maple syrup, you may need to add additional flour to the batter if the consistency becomes too thin.
- Vanilla Extract - If you're not making homemade vanilla extract yet, then run to that recipe and get some started! Once you try homemade, you'll never go back to store-bought again!
- Seasonings - It may sound strange to add seasonings to your pancakes, but if you've never tried adding nutmeg and cinnamon, it's a must-try! Also, don't forget the salt. Salt=flavor! We love Redmond Real Salt (use that link and coupon code "Pioneering" for 15% off at checkout).
- Baking Soda - This is a non-negotiable. In order to give our pancakes that light and fluffy texture we're all looking for, we have to create lift somehow. That's where the reaction with the baking soda and the sourdough starter comes in. This is also why we don't want to overmix our batter (or, if making the batter ahead of time, leave the baking soda out until just before making pancakes). Some people say using both baking soda and baking powder increases the fluffiness of the pancakes; feel free to add a teaspoon of each! Though my pancakes always turn out great without it.
- Milk - If your batter is too thick, you can thin it with a bit of milk or water. Add it in one Tablespoon at a time until the desired consistency is reached.
- Add-Ins - For customizable pancakes, grab some mix-ins and let everyone choose what kind of pancakes they want to eat!

Step-by-Step Directions
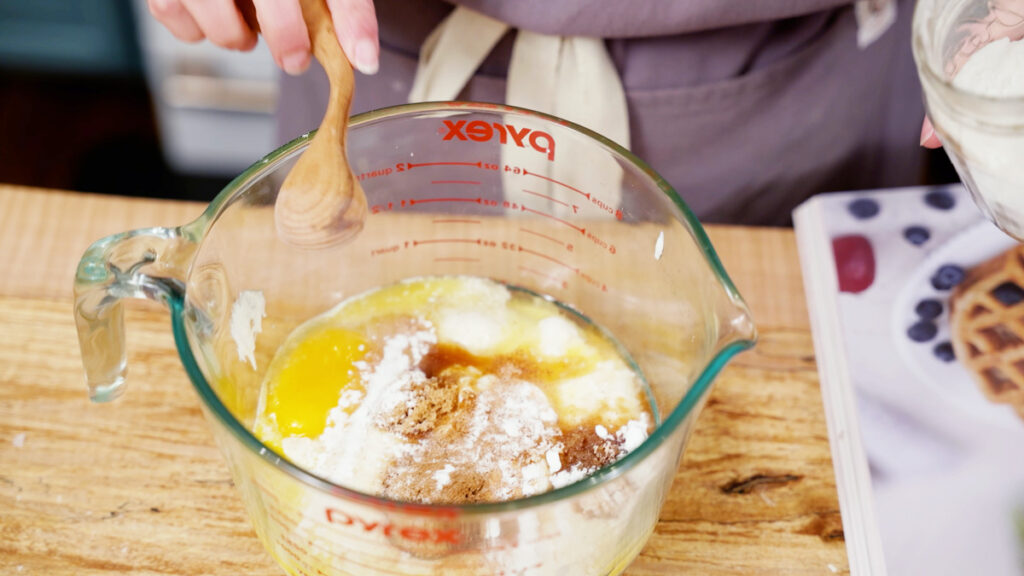
- Measure all ingredients into a mixing bowl.
- Stir well to combine. Be careful not to overmix the batter!
- Add additional milk (or water), if needed, to thin the batter to a pourable consistency. (If the batter is too runny, you can add additional flour, 1 Tablespoon at a time, until desired consistency is reached.)
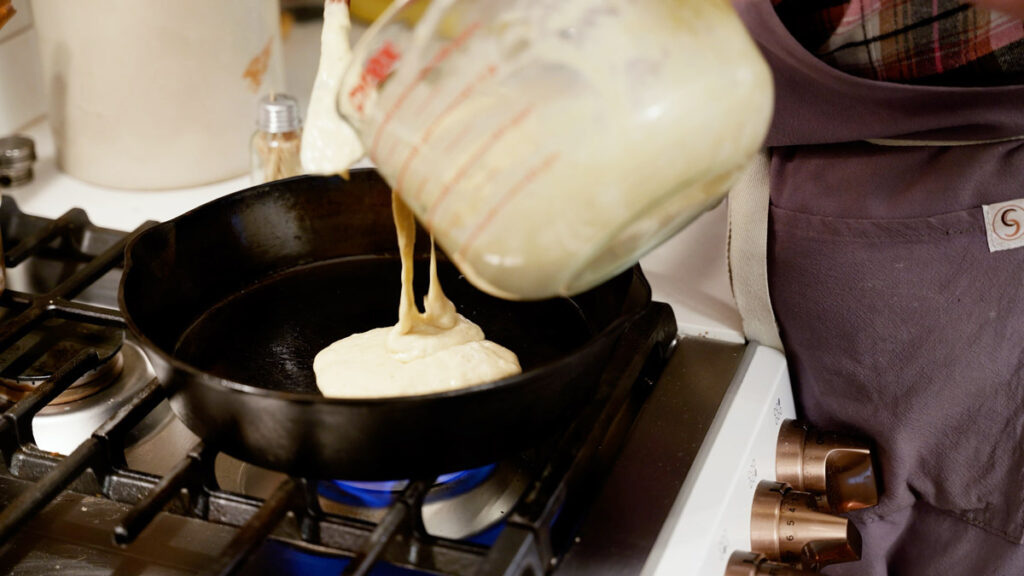
- Heat a cast iron skillet over medium (or medium-low) heat and melt a little bit of butter or coconut oil in the pan. Swirl oil around to coat the bottom of the pan.
- Add batter (about 1/3 cup) and cook until you see a few bubbles coming to the surface of the pancake (about 1 minute). Top pancakes with optional add-ins before you flip them over.
- Flip the pancake and cook the other side until cooked through (about 1 minute).
- Place cooked pancakes on a plate in the oven (set to the warm setting or 100°F) to keep pancakes warm until ready to serve.
- Serve with maple syrup, honey, homemade jam, or this chocolate gravy recipe.
Did you make these sourdough discard pancakes? If so, please leave a star⭐ rating and your comments? on the recipe card below! Then, snap a photo of your pancakes and tag me on social media @melissaknorris so I can see!
More Sourdough Recipes
- Sourdough Chocolate Sweet Bread
- Sourdough Tortillas
- Soft Sourdough Sandwich Bread
- Easy Sourdough Boule Recipe (5 Minutes Hands-On Time!)
- Easy Sourdough Starter
- How to Revive a Sourdough Starter
- Rehydrating a Dehydrated Sourdough Starter
📖 Recipe
Sourdough Pancakes (Easy Discard Recipe)
Equipment
- Medium-Sized Mixing Bowl about two quarts
- Measuring Cups and Spoons
- wooden spoon spatula, or dough whisk
- Cast Iron Skillet
- Spatula
Ingredients
- 2 cups sourdough discard
- 2 Tablespoons butter melted (coconut oil, ghee or avocado oil work, too)
- 3 Tablespoons plain yogurt or kefir (can sub milk, if needed)
- 1 whole egg
- 3 Tablespoons brown sugar or white sugar, maple syrup or honey
- 1 teaspoon vanilla extract
- 1/4 teaspoon ground nutmeg
- 1/4 teaspoon ground cinnamon
- 1/2 teaspoon salt use a scant 1/2 teaspoon if using salted butter
- 1 teaspoon baking soda
- milk if needed, to thin batter
- add-ins mini chocolate chips, blueberries or other add-in of choice (optional)
Instructions
- Measure all ingredients into a mixing bowl.
- Stir well to combine.
- Add additional milk (or water), if needed, to thin the batter to a pourable consistency. (If the batter is too runny, you can add additional flour, 1 Tablespoon at a time, until desired consistency is reached.)
- Heat a cast iron skillet (or frying pan) over medium heat and melt a little bit of coconut oil in the pan. Swirl oil around to coat the bottom of the pan.
- Add batter (about 1/3 cup) and cook until you see a few bubbles coming to the surface of the pancake (about 1 minute). Top pancakes with optional add-ins before you flip them over.
- Flip the pancake and cook the other side until cooked through (about 1 minute).
- Place cooked pancakes on a plate in the oven (set to the warm setting or 100°F) to keep pancakes warm until ready to serve.
Notes
- Temperature – Finding the right temperature for your pan and stove isn’t always the easiest. My tip is to do a test pancake and make necessary adjustments (like turning the heat down to medium-low if pancakes are cooking too quickly or burning) or adding more butter or oil if needed. Once you find the sweet spot, I like to jot it down right in my recipe book so next time I make this recipe I remember! If you’re looking at this recipe on your phone, feel free to print it out and store it in a kitchen recipe notebook, along with your notes about cooking temps, etc.
- Don’t Overmix – It’s tempting to continue mixing the batter until you’re certain everything is incorporated. Since we’re using baking soda and sourdough starter, those are the magic ingredients that will give your pancakes their fluffiness. If you overmix the batter, you’ll end up with flat pancakes (they’ll still taste delicious; they just won’t have as many air bubbles!).
- Use a Whisk – Using something like a dough whisk can help avoid over-mixing. You can absolutely use a wooden spoon or spatula, but if you’re not sure how to mix without over-mixing, a whisk can help.
- Keep Pancakes Warm – If you want the whole family to sit down and enjoy breakfast together (or maybe you’re cooking for a crowd), utilize the warm setting of your oven to keep the pancakes warm until the whole batch is done cooking. Just make sure to use a pot holder when removing your plate, casserole dish or baking sheet, as it could also get quite warm! Cover pancakes with a piece of foil to keep them warm.


Rebecca
Fluffiest pancakes ever! I used your sourdough starter recipe.... which is awesome. Used sprouted wheat flour. (From one degree). My starter is only 6 days old. Used 1 cup of discard plus one cup of the sprouted flour. These pancakes were so fluffy.... better than any I've had in a restaurant or at home! Fwiw: did like my amish in laws and Used a fork not whisk to mix. Mixed it thoroughly. Even the batter in the bowl was fluffy.
Melissa Norris
Woohoo!
Jocelyne
Thank you so much for this recipe. Just made it for supper. I only made half the recipe because I am on my own. I used everything in your recipe. My first pour was a bit runny but turned up very nice. For my 2nd batch I added one tbsp of flour and poured it by large tbsp to make little pancakes which I can use as a snack with home made apple sauce. They are about 3 inches in diameter. I will make them again on a regular basis to use my discard.
Amy
Delicious and so easy to make!
Jeannine Dowdell
These are truly the best pancakes ever. The recipe is easy to follow and my first try was a huge success! My husband and I are hooked on these. And as you say - no more store bought pancake mixes. There's just no cocmparision on how good these are.
Sharon Rondeau
The pancakes were great! I had to add about a cup of flour because the batter was too runny, and because of that I over-stirred it so they didn't get fluffy (as you said). I added blueberries and some cloves in addition to the nutmeg and cinnamon. I like the fact that the recipe was designed to not need extra flour, as I already use so much flour during the week with two active sourdough starters and in recipes to use up the discard. This recipe is excellent because it uses up so much discard at once!
Kelsey
This is such a great recipe for using up sourdough discard. I also love her tip on not feeding your sourdough starter so much so you don't end up with tons of discard! BUT, having discard recipes like this is so helpful!
David & Sharon Strandberg
Hi, I was getting things ready to make this recipe and I noticed there is no flour in the list of ingredients. Instructions step #3 says you can add additional flour yet I don't see flour in the recipe. Should there be flour in this recipe? Thank you.
Melissa K Norris
There is no additional flour, this is a sourdough discard recipe. You only would add additional flour if it's too sticky to roll as people keep their starters at different hydration levels.