Learning how to make apple cider vinegar at home is one of the easiest things to make and even if you’ve had trouble, I’ve got troubleshooting tips so your homemade apple cider vinegar turns out, because it’s one of those things that every homestead (and home) should have on hand. You know that saying an apple a day keeps the doctor away, well I think apple cider vinegar should go into that saying too. If you prefer to listen to this podcast then just click play below, or you can also watch the video (the podcast also has our verse of the week and faith encouragement as well) or (because we all like our choices) you can simply read the instructions below. You can subscribe via RSS and receive every episode for free.
![]() Or subscribe via Itunes
Or subscribe via Itunes As a frugal loving Mamma, I love that I can take something I’d normally throw away, and turn it into a useful and actually good for me item. To make apple cider vinegar, which this method is technically apple scrap vinegar, you only need 2 ingredients and a Mason jar.Because we’re using apples and they fall on the heavy pesticide list, I only use organic apples or ones we’ve grown (or neighbors) where I know they’ve not been sprayed. Totally up to you, but the quality of the ingredients we put in determines the quality of the end product.Disclosure: Some of the below links are affiliate links.
Table of Contents[Hide][Show]
- Ingredients to Make Raw Apple Cider Vinegar
- How to Make Homemade Apple Cider Vinegar with Mother
- How to tell Homemade Raw Apple Cider Vinegar is Ready to Strain
- Troubleshooting tips for Homemade Apple Cider Vinegar
- When is Home Apple Cider Vinegar Ready to Use
- How to Make Raw Apple Cider Vinegar at Home
- Free Apple Preserving & Use mini Cookbook
Ingredients to Make Raw Apple Cider Vinegar
Apple peels, cores, and scrap pieces of apple, water, Mason jar and band, Coffee filter/cheese cloth/towel. Note: If you’re on city water or water that has chlorine in it, either boil the water for 20 minutes and let it cool or let it sit uncovered in the fridge for 24 hours to remove most of the chlorine.
How to Make Homemade Apple Cider Vinegar with Mother
- Place your apple peels, cores and scrap pieces of apples into a clean wide mouth Mason jar until 2/3 of the way full. Cover with water until apples are completely submerged.
- Place a breathable material on top of the lid and hold it in place with either a metal band or a rubber band to keep out contaminants and most importantly, to keep out the fruit flies.
- Store it on the counter top or where you’ll remember to keep an eye on it for 2 to 3 weeks. Check that the apples have remained below the surface of the water every few days. *This is the first ferment See below for tips to know it’s ready to strain
- After 2 to 3 weeks (you can even go 4 weeks, just keep an eye on your liquid level being above the apple scraps), strain out the solids and put the liquid into a clean Mason jar and place a breathable cloth or lid on it. Put it in a dark area and let it continue to ferment until it becomes vinegar, usually about 4 to 6 weeks. *this is the second ferment and this stage goes on until the vinegar is all used up
How to tell Homemade Raw Apple Cider Vinegar is Ready to Strain
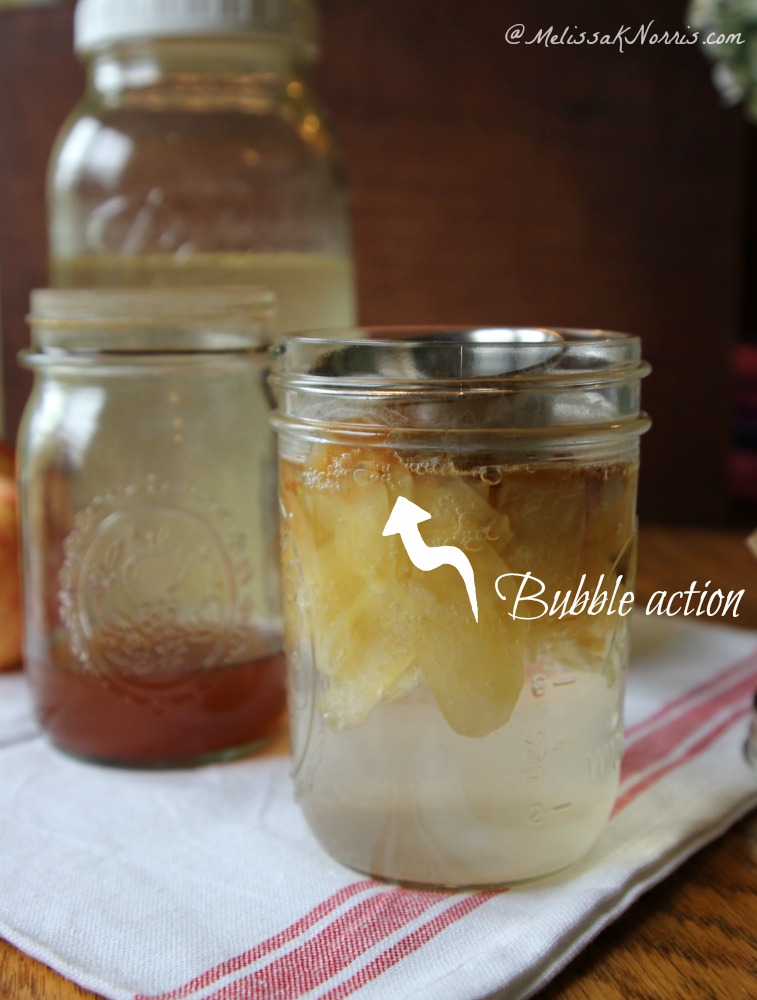
- Bubbles, during the first ferment (before you strain out the solids) check for bubbles. The presence of bubbles mean there is good bacteria activity.
- Color change, The color should start to darken up and no longer be clear water, but a light yellow at this stage.
- Odor, You should start to smell a slight vinegar odor. It shouldn’t be a bad smell, but a light tang so to speak. It first turns to alcohol and then it turns to vinegar.
Troubleshooting tips for Homemade Apple Cider Vinegar
If you develop mold on your apple cider vinegar it’s because the apple scraps were not kept beneath the surface of the water. Use a fermenting weight to hold the scraps beneath the water or a smaller jar with water inside to act as a weight. Remove any pieces with mold and allow it to ferment for another week. If mold grows back, toss it out and start over, making sure to use a weight from the beginning.
There’s a film on top, what now?
Try skimming off the layer of film and letting it ferment for another week, making sure everything is submerged beneath the water.
How to make apple cider vinegar without sugar.
Many people will use a small amount of sugar or honey to help jump-start the vinegar (this provides the bacteria more to feed on), but I’ve never found the need to do this as apples have a good amount of sugar in them already. You can also use a few teaspoons of raw apple cider vinegar with the mother in it as well, but again, I’ve never had to do this.
The apple cider vinegar has cloudy stuff in it?
Congratulations, you’ve got a strain of good bacteria and yeast growing called the mother!
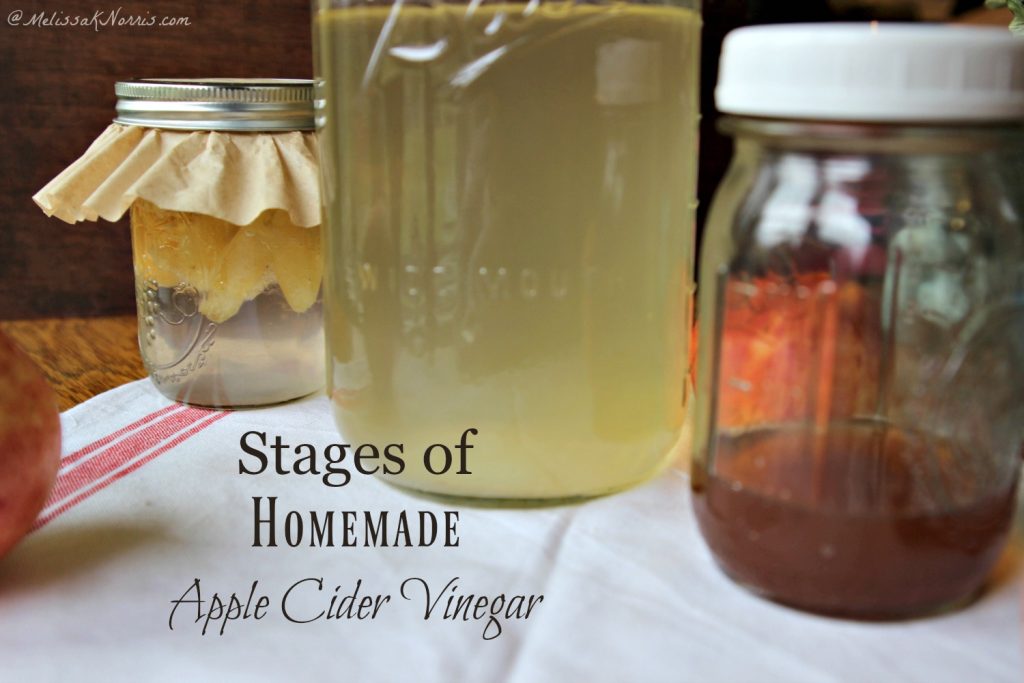
from left to right, first jar is in the first ferment, second jar is at 2 weeks of the second ferment, and the third jar is one year old homemade apple cider vinegar
Note: Homemade Apple Cider Vinegar can be used in place of store-bought in everything except canning. For canning safety, vinegar must be 5% acidity and we don’t have a true reliable way to test the level of our homemade apple cider vinegar to make sure it’s safe for using in canning (the little ph strips are not reliable enough for this).
When is Home Apple Cider Vinegar Ready to Use
It should turn from a pale yellow to a darker golden color. It should smell like vinegar, with a strong odor (not a bad rotten smell) but that tang of vinegar. You should see some cloudy sediment when you shake the jar, almost cob-webby in appearance. Did you know that apple cider vinegar is one of the most versatile items you have in your home (the real stuff with the mother in it like we just made at home)? Seriously, from helping with your health (we got studies to back this one up) to skin care, to cleaning, to cooking and baking (one of my favorite ways to use it) and to help rid the kitchen of fruit flies?

How to Make Raw Apple Cider Vinegar at Home
Ingredients
- Apple peels cores, and scrap pieces of apple
- Water
- Mason jar and band
- Coffee filter/cheese cloth/towel
- Note: If you’re on city water or water that has chlorine in it either boil the water for 20 minutes and let it cool or let it sit uncovered in the fridge for 24 hours to remove most of the chlorine.
Instructions
- Place your apple peels, cores and scrap pieces of apples into a clean wide mouth Mason jar until ⅔ of the way full. Cover with water until apples are completely submerged.
- Place a breathable material on top of the lid and hold it in place with either a metal band or a rubber band to keep out contaminants and most importantly, to keep out the fruit flies.
- Store it on the counter top or where you’ll remember to keep an eye on it for 2 to 3 weeks. Check that the apples have remained below the surface of the water every few days. *This is the first ferment See below for tips to know it’s ready to strain
- After 2 to 3 weeks (I've went 4 weeks, just keep an eye on the apple scraps staying beneath the liquid level), strain out the solids and put the liquid into a clean Mason jar and place brethable material onn it. Put it in a dark area and let it continue to ferment until it becomes vinegar, usually about 4 to 6 weeks. *This is the second ferment and this stage goes on until the vinegar is all used up
- After it's turned into vinegar, place a lid on and use it until it's all gone, but don't forget to start another batch!
Notes
Want more from scratch and frugal recipes in your home? This tutorial is from The Made-From-Scratch Life, Simple Ways to Create a Natural Home. P.S. check out the bonuses while you’re there!Now that you know how easy it is to make apple cider vinegar with the mother at home, go get your first batch started!
Put your apples to use with these easy 8 recipes and tutorials to save time and money!
Free Apple Preserving & Use mini Cookbook
Build your pantry with easy canning, baking, apple cider vinegar, with our 8 favorite tutorials and recipes!
Start preserving and using your apples with our free apple mini cookbook, just click here to get instant access.

