Homemade Mint Extract Recipe | Easy Garden-to-Pantry Flavoring
Turn fresh garden mint into homemade mint extract with just two ingredients! This easy DIY pantry staple is perfect for baking, desserts, drinks, and thoughtful homemade gifts. Learn how to make mint extract the traditional homestead way and enjoy fresh mint flavor year-round.
Servings: 32 servings
Calories: 36kcal
Cost: Varies
Equipment
- Mason jar
- Strainer
- Storage Bottles
Ingredients
- 1 cup fresh mint leaves
- 2 cups vodka Or rum. See notes below for non-alcoholic instructions.
Instructions
- Pick your mint leaves in the morning when they have the highest concentration of oils in leaves. Rinse and pat dry.
- Discard any burnt or damaged-looking leaves. Strip the leaves from the stem. Roll the leaves up between your fingers so they’re good and bruised (or you can roughly chop them).
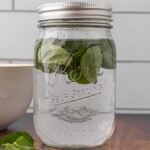
- Put the mint leaves inside your glass jar. You’re looking for about a 1:2 ratio of mint to alcohol. So for one cup of mint, I’ll add about two cups of rum, vodka or my non-alcoholic option (see notes below).
- Add alcohol to completely submerge the mint leaves. Place lid on jar and give it a good shake.
- Place the jar in a cupboard or on a shelf out of direct light, but somewhere you’ll remember to shake it every few days.
- Let the mint leaves steep for at least six weeks. You can allow it to steep longer for a stronger flavored extract.
- When the mint extract has reached its desired strength, strain out the mint leaves with a fine mesh colander or sieve and pour the remaining extract into a glass container.
Notes
How to Make Mint Extract Without Alcohol:
If you'd like to make a non-alcoholic mint extract, you can use either apple cider vinegar or glycerin.
- For Apple Cider Vinegar - Combine 1 cup apple cider vinegar with 1 cup water. Use 1 cup fresh mint leaves or ½ cup dried. Add one to two tablespoons of honey and follow the instructions in the recipe card below.
- For Glycerin - Combine three parts glycerin to one part distilled water in place of the alcohol (so if you need two cups of alcohol, use 1 ⅓ cups glycerin and ⅔ cup distilled water). Continue with the recipe in the recipe card as follows. Make sure you use food-grade glycerin like that one.
- If you are short on time for gifting, create a DIY homemade extract kit by giving one of these flip-top bottles with the filled Mason jar of seeping extract and instructions on when to strain it. This way you're teaching the person how to make their own DIY mint extract by just doing the first part for them. Now they'll have the jars to make it again and only have to purchase the ingredients when they run out!
- Harvest mint before flowering for the strongest flavor.
- Keep all leaves completely submerged to prevent spoilage.
- Label jars with the preparation date.
- Use rum if you prefer to avoid grain-based alcohols.
- Let the extract steep longer for a more concentrated flavor.
- Store the jar somewhere visible so you remember to shake it regularly.
Nutrition
Serving: 1Tablespoon | Calories: 36kcal | Carbohydrates: 0.2g | Protein: 0.1g | Fat: 0.01g | Saturated Fat: 0.003g | Polyunsaturated Fat: 0.01g | Sodium: 1mg | Potassium: 8mg | Fiber: 0.1g | Vitamin A: 60IU | Vitamin C: 0.4mg | Calcium: 3mg | Iron: 0.1mg
